Integrate Threat-Events™ with Swift & Kotlin in Flutter Apps
Last updated November 28, 2024 by Appdome
This guide walks you through the integration of Appdome’s Threat-Events™ into your Flutter applications using Swift and Kotlin
What are Threat-Events?
Appdome Threat-Events is a robust threat-intelligence framework designed for Android and iOS apps. It consists of three key elements:
Threat Event: Specific security incidents detected within the app.
Data from Each Threat Event: Detailed insights about each incident.
Threat-Score™: An aggregated risk score reflecting the overall threat level.
Threat-Events streamlines the process for mobile developers by enabling them to register for, listen to, and consume real-time attack and threat data, courtesy of Appdome’s suite of mobile app security, anti-fraud, and mobile anti-bot protection measures. This functionality offers mobile app developers the ability to customize business logic and user experience based on the user’s risk profile and the specific attack or threat presented but also ensures that their mobile application workflows are aware of attacks and threats. Furthermore, it facilitates the passing of threat data to other systems of record, such as app servers, mobile fraud analysis systems, SIEMs, and other data collection points.
The purpose of Threat Events is to enable Android and iOS applications to adapt and respond to mobile app attacks and threats in real-time. This will ensure the safety of users, data, and transactions.
Threat-Events and/or Threat-Scores have been enabled (turned ON) for the specific protection.
You are using the correct identifiers for the Threat-Events for each protection.
Note: The specific identifiers for each Threat Event and Threat Score are in the knowledge base article associated with each protection.
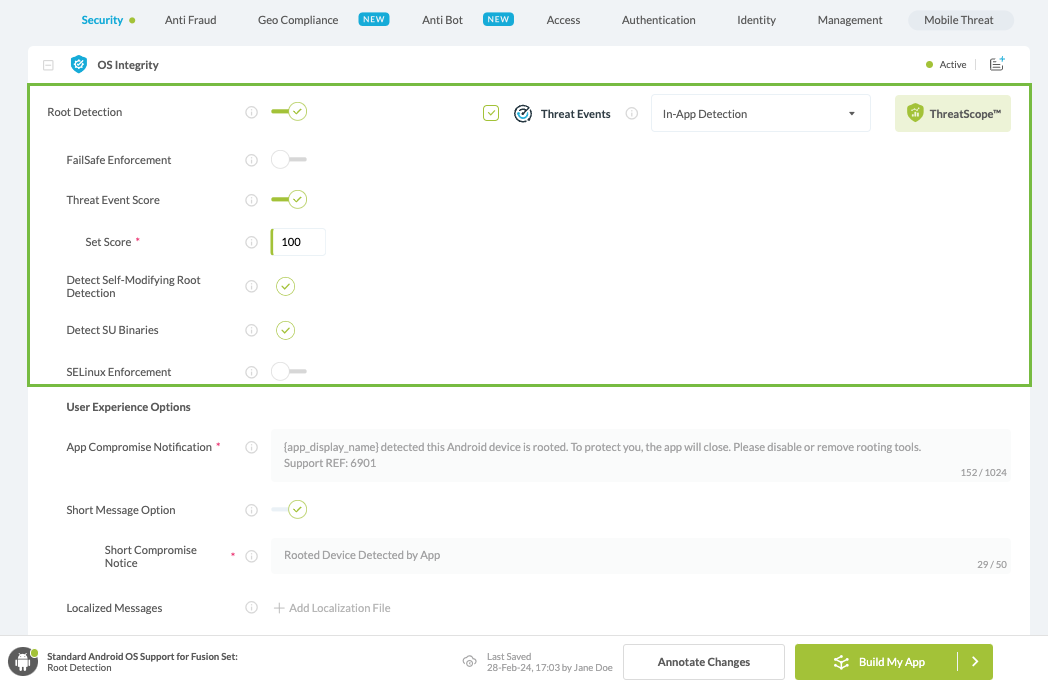
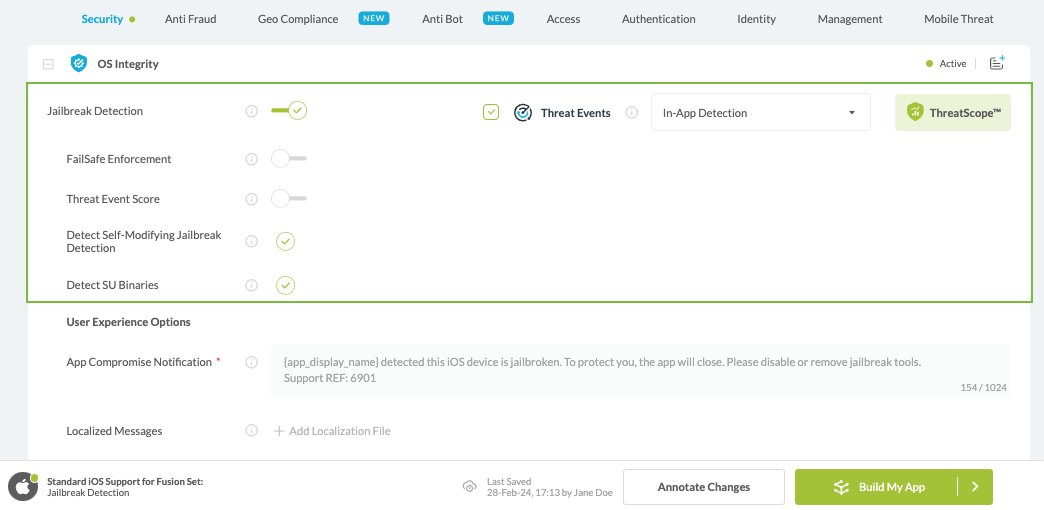
The figure below shows where you can find Threat Events and Threat Scores for each of the runtime mobile app security, anti-fraud, anti-malware, mobile antibot, and other protections available on Appdome.
Android
iOS
To enable Threat-Events with any runtime protection, select the check box next to Threat-Events for that feature. Doing so will enable (turn ON) Threat-Events for that feature. To enable Threat Scores for any runtime protection, click the up/down arrow associated with Threat Scores to assign a specific score to each protection.
Threat scores must have a value greater than zero (0) and less than a thousand (1,000).
Threat-Events and Threat-Scores can be used with or in place of server-based mobile anti-fraud solutions.
Communicating with Native Platforms in Flutter
Flutter provides various approaches to bridge the gap between its Dart code and platform-specific functionality on Android and iOS. Some common options include:
Event Channels: This is the go-to method for most situations. It sets up named channels enabling bidirectional communication between Dart and native code.
Platform Views: This technique allows you to integrate native UI components, granting access to features like maps or cameras directly within your Flutter app.
Method Channels: A specialized type of platform channel, it specifically focuses on invoking methods on the native side and retrieving results back in Dart.
Choose the approach that best suits your needs when bridging the gap between Flutter and native platforms Threat-Events.
Prioritizing Security with Event Channels:
Event channels are the optimal approach for integrating threat events into your Flutter app due to their inherent security-centric advantages:
Leveraging Native Security: Appdome platform functionalities are specifically designed to detect and mitigate security threats on iOS and Android applications. By establishing an event channel, your Flutter app enables Appdome to seamlessly tap into these platform-specific capabilities, gaining access to sophisticated threat detection mechanisms without compromising security by directly accessing native system resources.
Immediate Threat Awareness & Response: Event channels enable real-time communication between Appdome and your Flutter app, allowing for immediate reports of detected threats.
Integrating Secure Event Channels into Your Flutter Application:
Adjust EventChannel Name:
Locate ״_eventChannelName״ and replace ״yourEventChannel״ with a unique and descriptive EventChannel name relevant to your application.
Customize Event Handling:
In the ״_onEvent״ method, customize the handling of received events based on your specific needs.
Flutter
Plain text
Copy to clipboard
Open code in new window
EnlighterJS 3 Syntax Highlighter
import'dart:async';
import'package:flutter/material.dart';
import'package:flutter/services.dart';
class PlatformChannel extends StatefulWidget {
constPlatformChannel({super.key});
@override
State createState()=>_PlatformChannelState();
}
class _PlatformChannelState extends State {
staticconst String _eventChannelName = 'yourEventChannel'; // Replace with your EventChannel name
package com.example.threat_intelligence_swift_kotlin

import io.flutter.embedding.android.FlutterActivity
import io.flutter.embedding.engine.FlutterEngine
import io.flutter.plugin.common.EventChannel
import io.flutter.plugin.common.EventChannel.EventSink

class MainActivity : FlutterActivity() {
    private val YOUR_EVENT_CHANNEL = "yourEventChannel" // Replace with your EventChannel name

    override fun configureFlutterEngine(flutterEngine: FlutterEngine) {
        super.configureFlutterEngine(flutterEngine)
        EventChannel(flutterEngine.dartExecutor.binaryMessenger, YOUR_EVENT_CHANNEL).setStreamHandler(
            object : EventChannel.StreamHandler {
                private var threatEventReceiver: ThreatEventReceiver? = null

                override fun onListen(arguments: Any?, events: EventSink?) {
                    threatEventReceiver = ThreatEventReceiver()
                    threatEventReceiver!!.init(this@MainActivity, events)
                }

                override fun onCancel(arguments: Any?) {
                    threatEventReceiver!!.stop()
                    threatEventReceiver = null
                }
            }
        )
    }
}
package com.example.threat_intelligence_swift_kotlin
import io.flutter.embedding.android.FlutterActivity
import io.flutter.embedding.engine.FlutterEngine
import io.flutter.plugin.common.EventChannel
import io.flutter.plugin.common.EventChannel.EventSink
class MainActivity : FlutterActivity() {
private val YOUR_EVENT_CHANNEL = "yourEventChannel" // Replace with your EventChannel name
override fun configureFlutterEngine(flutterEngine: FlutterEngine) {
super.configureFlutterEngine(flutterEngine)
EventChannel(flutterEngine.dartExecutor.binaryMessenger, YOUR_EVENT_CHANNEL).setStreamHandler(
object : EventChannel.StreamHandler {
private var threatEventReceiver: ThreatEventReceiver? = null
override fun onListen(arguments: Any?, events: EventSink?) {
threatEventReceiver = ThreatEventReceiver()
threatEventReceiver!!.init(this@MainActivity, events)
}
override fun onCancel(arguments: Any?) {
threatEventReceiver!!.stop()
threatEventReceiver = null
}
}
)
}
}
Open the ThreatEventReceiver.kt file
Modify the event list to fit with the event names you selected during the fuse to be passed as ThreatEvent. Note: Create a ThreatEventReceiver.kt file in your application project if you do not have an existing one.
package com.example.threat_intelligence_swift_kotlin
import android.content.BroadcastReceiver
import android.content.Context
import android.content.Intent
import android.content.IntentFilter
import android.os.Build
import io.flutter.plugin.common.EventChannel.EventSink
class ThreatEventReceiver {
    private var receiver: BroadcastReceiver? = null
    private var context: Context? = null
    private val TAG = "ThreatEventReceiver"
    private val BLOCKED_KEYBOARD = "BlockedKeyboardEvent" // Replace with your event names
    private val BLOCKED_CLIPBOARD = "BlockedClipboardEvent"
    private val ROOTED_DEVICE = "RootedDevice"
    private val UNKNOWN_SOURCES = "UnknownSourcesEnabled"
    private val DEVELOPER_OPTIONS = "DeveloperOptionsEnabled"
    private val SSL_VALIDATION_FAILED = "SslCertificateValidationFailed"
    private val SSL_NON_SSL_CONNECTION = "SslNonSslConnection"
    private val SSL_CERT_PINNING_FAILED = "SslCertificatePinningFailed"
    private val ACCESS_OUTSIDE_WHITELIST = "UrlWhitelistFailed"
    private val SSL_INCOMPATIBLE_CIPHER = "SslIncompatibleCipher"
    private val SSL_INCOMPATIBLE_TLS = "SslIncompatibleVersion"
    private val SSL_INVALID_CA_CHAIN = "SslInvalidCertificateChain"
    private val SSL_INVALID_RSA_SIGNATURE = "SslInvalidMinRSASignature"
    private val SSL_INVALID_ECC_SIGNATURE = "SslInvalidMinECCSignature"
    private val SSL_INVALID_DIGEST = "SslInvalidMinDigest"
    private val BLOCKED_MANUFACTURER = "BannedManufacturer"
    // Only available when ONEShield Threat Events are enabled
    private val TAMPERED_APP = "AppIntegrityError"
    private val EMULATOR_FOUND = "EmulatorFound"
    // Explicitly state that the ThreatEvents BroadcastReceiver should not be exported
    private fun registerReceiverWithFlags(intentFilter: IntentFilter) {
        if (Build.VERSION.SDK_INT >= Build.VERSION_CODES.TIRAMISU) {
            context!!.registerReceiver(receiver, intentFilter, Context.RECEIVER_NOT_EXPORTED)
        } else {
            context!!.registerReceiver(receiver, intentFilter)
        }
    }
    fun init(context: Context?, events: EventSink?) {
        this.context = context
        receiver = object : BroadcastReceiver() {
            override fun onReceive(context: Context, intent: Intent) {
                if (intent.action != null) {
                    val map: MutableMap<String, Any?> = HashMap()
                    val extras = intent.extras
                    if (extras != null) {
                        for (key in extras.keySet()) {
                            val value = extras[key]
                            map[key] = value
                        }
                        events?.success(map)
                    }
                } else {
                    events?.error("UNAVAILABLE", "ThreatEvent action is null", null)
                }
            }
        }
        registerReceiverWithFlags(IntentFilter(BLOCKED_KEYBOARD))
        registerReceiverWithFlags(IntentFilter(BLOCKED_CLIPBOARD))
        registerReceiverWithFlags(IntentFilter(ROOTED_DEVICE))
        registerReceiverWithFlags(IntentFilter(UNKNOWN_SOURCES))
        registerReceiverWithFlags(IntentFilter(DEVELOPER_OPTIONS))
        registerReceiverWithFlags(IntentFilter(SSL_VALIDATION_FAILED))
        registerReceiverWithFlags(IntentFilter(SSL_NON_SSL_CONNECTION))
        registerReceiverWithFlags(IntentFilter(SSL_CERT_PINNING_FAILED))
        registerReceiverWithFlags(IntentFilter(ACCESS_OUTSIDE_WHITELIST))
        registerReceiverWithFlags(IntentFilter(SSL_INCOMPATIBLE_CIPHER))
        registerReceiverWithFlags(IntentFilter(SSL_INCOMPATIBLE_TLS))
        registerReceiverWithFlags(IntentFilter(SSL_INVALID_CA_CHAIN))
        registerReceiverWithFlags(IntentFilter(SSL_INVALID_RSA_SIGNATURE))
        registerReceiverWithFlags(IntentFilter(SSL_INVALID_ECC_SIGNATURE))
        registerReceiverWithFlags(IntentFilter(SSL_INVALID_DIGEST))
        registerReceiverWithFlags(IntentFilter(BLOCKED_MANUFACTURER))
        // Only available when ONEShield Threat Events are enabled
        registerReceiverWithFlags(IntentFilter(TAMPERED_APP))
        registerReceiverWithFlags(IntentFilter(EMULATOR_FOUND))
    }
    fun stop() {
        context!!.unregisterReceiver(receiver)
    }
}
package com.example.threat_intelligence_swift_kotlin
import android.content.BroadcastReceiver
import android.content.Context
import android.content.Intent
import android.content.IntentFilter
import android.os.Build
import io.flutter.plugin.common.EventChannel.EventSink
class ThreatEventReceiver {
private var receiver: BroadcastReceiver? = null
private var context: Context? = null
private val TAG = "ThreatEventReceiver"
private val BLOCKED_KEYBOARD = "BlockedKeyboardEvent" // Replace with your event names
private val BLOCKED_CLIPBOARD = "BlockedClipboardEvent"
private val ROOTED_DEVICE = "RootedDevice"
private val UNKNOWN_SOURCES = "UnknownSourcesEnabled"
private val DEVELOPER_OPTIONS = "DeveloperOptionsEnabled"
private val SSL_VALIDATION_FAILED = "SslCertificateValidationFailed"
private val SSL_NON_SSL_CONNECTION = "SslNonSslConnection"
private val SSL_CERT_PINNING_FAILED = "SslCertificatePinningFailed"
private val ACCESS_OUTSIDE_WHITELIST = "UrlWhitelistFailed"
private val SSL_INCOMPATIBLE_CIPHER = "SslIncompatibleCipher"
private val SSL_INCOMPATIBLE_TLS = "SslIncompatibleVersion"
private val SSL_INVALID_CA_CHAIN = "SslInvalidCertificateChain"
private val SSL_INVALID_RSA_SIGNATURE = "SslInvalidMinRSASignature"
private val SSL_INVALID_ECC_SIGNATURE = "SslInvalidMinECCSignature"
private val SSL_INVALID_DIGEST = "SslInvalidMinDigest"
private val BLOCKED_MANUFACTURER = "BannedManufacturer"
// Only available when ONEShield Threat Events are enabled
private val TAMPERED_APP = "AppIntegrityError"
private val EMULATOR_FOUND = "EmulatorFound"
// Explicitly state that the ThreatEvents BroadcastReceiver should not be exported
private fun registerReceiverWithFlags(intentFilter: IntentFilter) {
if (Build.VERSION.SDK_INT >= Build.VERSION_CODES.TIRAMISU) {
context!!.registerReceiver(receiver, intentFilter, Context.RECEIVER_NOT_EXPORTED)
} else {
context!!.registerReceiver(receiver, intentFilter)
}
}
fun init(context: Context?, events: EventSink?) {
this.context = context
receiver = object : BroadcastReceiver() {
override fun onReceive(context: Context, intent: Intent) {
if (intent.action != null) {
val map: MutableMap<String, Any?> = HashMap()
val extras = intent.extras
if (extras != null) {
for (key in extras.keySet()) {
val value = extras[key]
map[key] = value
}
events?.success(map)
}
} else {
events?.error("UNAVAILABLE", "ThreatEvent action is null", null)
}
}
}
registerReceiverWithFlags(IntentFilter(BLOCKED_KEYBOARD))
registerReceiverWithFlags(IntentFilter(BLOCKED_CLIPBOARD))
registerReceiverWithFlags(IntentFilter(ROOTED_DEVICE))
registerReceiverWithFlags(IntentFilter(UNKNOWN_SOURCES))
registerReceiverWithFlags(IntentFilter(DEVELOPER_OPTIONS))
registerReceiverWithFlags(IntentFilter(SSL_VALIDATION_FAILED))
registerReceiverWithFlags(IntentFilter(SSL_NON_SSL_CONNECTION))
registerReceiverWithFlags(IntentFilter(SSL_CERT_PINNING_FAILED))
registerReceiverWithFlags(IntentFilter(ACCESS_OUTSIDE_WHITELIST))
registerReceiverWithFlags(IntentFilter(SSL_INCOMPATIBLE_CIPHER))
registerReceiverWithFlags(IntentFilter(SSL_INCOMPATIBLE_TLS))
registerReceiverWithFlags(IntentFilter(SSL_INVALID_CA_CHAIN))
registerReceiverWithFlags(IntentFilter(SSL_INVALID_RSA_SIGNATURE))
registerReceiverWithFlags(IntentFilter(SSL_INVALID_ECC_SIGNATURE))
registerReceiverWithFlags(IntentFilter(SSL_INVALID_DIGEST))
registerReceiverWithFlags(IntentFilter(BLOCKED_MANUFACTURER))
// Only available when ONEShield Threat Events are enabled
registerReceiverWithFlags(IntentFilter(TAMPERED_APP))
registerReceiverWithFlags(IntentFilter(EMULATOR_FOUND))
}
fun stop() {
context!!.unregisterReceiver(receiver)
}
}
Compatibility with Android 14
Compatibility with Android 14 is seamless through Flutter EventChannel. Utilizing native platform implementations, the code sample provided above ensures that no modifications are needed to make your app fully compatible with Android 14.
Special Considerations
Replace the event identifiers in your ThreatEventReceiver according to the selections you made while fusing the application. To find the relevant Threat-Event context key, search for the specific feature via our knowledge base and navigate to the code sample section in the relevant article.
You can stack multiple listeners for various events for comprehensive threat detection and response capabilities.
Meta-Data for Mobile Application Threat-Events and Threat-Scores
Below is the list of metadata that can be associated with each mobile application, Threat-Event and Threat-Score in Flutter Apps.
Threat-Event Context Keys
message
Message displayed for the user on the event
externalID
The external ID of the event, which can be listened to via Threat Events
osVersion
OS version of the current device
deviceModel
Current device model
deviceManufacturer
The manufacturer of the current device
fusedAppToken
The task ID of the Appdome fusion of the currently running app
kernelInfo
Info about the kernel: system name, node name, release, version, and machine.
carrierPlmn
PLMN of the device
deviceID
Current device ID
reasonCode
Reason code of the occurred event
buildDate
Appdome fusion date of the current application
devicePlatform
OS name of the current device
carrierName
Carrier name of the current device
updatedOSVersion
Is the OS version up to date
deviceBrand
Brand of the device
deviceBoard
Board of the device
buildUser
Build user
buildHost
Build host
sdkVersion
Sdk version
timeZone
Time zone
deviceFaceDown
Is the device face-down
locationLong
Location longitude
locationLat
Location latitude
locationState
Location state
wifiSsid
Wifi SSID
wifiSsidPermissionStatus
Wifi SSID permission status
Some or all of the meta-data for each mobile application Threat-Event and Threat-Score can be consumed in Flutter Apps at the discretion of the mobile developer and used, in combination with other mobile application data, to adapt the business logic or user experience when one or more attacks or threats are present.
Using Conditional Enforcement for Mobile Application Threat-Events and Threat-Scores
Conditional Enforcement is an extension to Appdome’s mobile application Threat-Event framework. By using conditional enforcement, developers can control when Appdome enforcement of each mobile application protection takes place or invoke backup, failsafe, and enforcement to any in-app enforcement used by the mobile developer.
Verifying Threat-Events in Flutter Apps
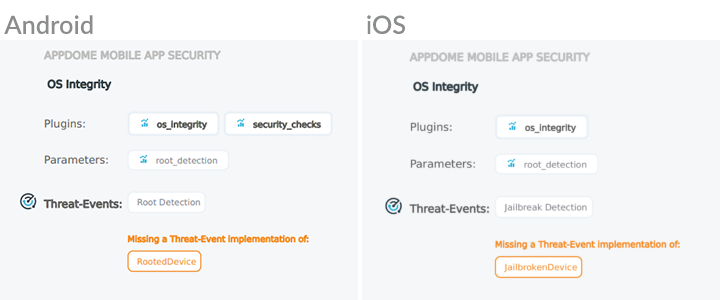
After you have implemented the required Threat-Event code in your Flutter Apps, you can confirm that the Appdome protections in the Flutter Apps properly recognize your Threat-Event implementation by reviewing the Certified Secure™ DevSecOps certificate for your build on Appdome.
In the Certified Secure DevSecOps certificate, an incorrect implementation of Threat-Events in your mobile application is displayed as shown below.
If you have any questions, please send them our way at support.appdome.com or via the chat window on the Appdome platform.
Thank you!
Thanks for visiting Appdome! Our mission is to secure every app on the planet by making mobile app security easy. We hope we’re living up to the mission with your project.
Want a Demo?
Threat-Events™ UX/UI Control
GilWe're here to help
We'll get back to you in 24 hours to schedule your demo.