How to use Conditional Enforcement in Mobile Apps Using AI
What Is Conditional Enforcement?
Conditional Enforcement is a flexible security mechanism that allows mobile app developers to define when protective actions—like terminating the app or limiting functionality—should activate after a threat is detected. Instead of immediately stopping the app, Appdome alerts developers, giving them the option to customize the timing and type of response. This flexibility is particularly beneficial when immediate termination might disrupt critical processes or negatively impact user experience. Conditional Enforcement empowers developers to manage responses effectively without compromising app usability, especially in cases where threat mitigation requires gradual escalation.
Allowing tailored responses ensures app security while balancing operational needs, ultimately helping to comply with user experience guidelines and operational standards in regulated environments.
How Appdome Protects Mobile Apps With Conditional Enforcement?
Appdome’s dynamic Conditional Enforcement plugin provides developers the ability to trigger security actions only after receiving an input threat event and deciding the appropriate response. Once a threat is detected, Appdome alerts the app, but the developer determines the timing of actions like app exit or functionality restriction.
This empowers developers to align security responses with business logic, operational workflows, or user experience priorities, ensuring that protective actions occur at the most appropriate time.
Why Developers Might Use Conditional Enforcement
This feature is beneficial for those who need to tailor their app’s security responses to specific operational requirements. By choosing when to terminate the app after a threat is detected, developers can ensure that essential processes are completed and user experience is not unnecessarily disrupted.
Prerequisites for using Appdome Conditional Enforcement
- Appdome account – Appdome DEV or Higher.
- Threat-Events license
- A license for Conditional Enforcement
- Mobile App (.ipa for iOS, or .apk or .aab for Android)
- Signing Credentials (e.g., signing certificates and provisioning profile) – see Signing Secure Android apps and Signing Secure iOS apps.
- Threat-Events have been enabled ( turned ON) for the specific protection
You are using the correct identifiers for the Threat-Events for each protection.
Using Input Threat-Events™ for Conditional Enforcement in Mobile Apps
Before enabling the Conditional Enforcement feature, ensure your app has been uploaded to the Appdome platform with the necessary input threat event, as shown in the following code example. This is crucial for the feature to function correctly.
Note: Input Threat Events are not natively supported for multi-platform frameworks such as React Native, Flutter, and Cordova. If you are using these coding languages, it is recommended that you build a bridge class that acts as an intermediary between the framework and the mobile native API.
For more details on how to build bridging classes for Flutter and Cordova, please refer to the following documentation: Flutter and Cordova Plugin Development Guide.
Java
When setting up threat events for Java-coded apps, please refer to this KB: Threat-Events™, In-App Threat Intelligence in Native Android Apps
We recommend adding the conditional enforcement operation to ensure that your mobile app
String action = intent.getAction();
switch (action) {
  case ROOTED_DEVICE:
  //
  // Respond to mobile app attacks and threats here, as seen above
  //
  // Notify Appdome to enforce the Threat Event after Threat Event is handled
  Intent newIntent = new Intent("ConditionalEnforcementEvent");
  newIntent.putExtras(intent.getExtras());
  newIntent.setPackage(context.getPackageName());
  context.sendBroadcast(newIntent);
}
Kotlin
val action = intent.action
when (action) {
  "RootedDevice" -> {
    //
    // Respond to mobile app attacks and threats here, as seen above
    // Notify Appdome to enforce the Threat Event after Threat Event is handled
    val newIntent = Intent("ConditionalEnforcementEvent").apply {
      putExtras(intent.extras)
    }
    context.sendBroadcast(newIntent)
  }
}
Xamarin/MAUI Android – CSharp
String action = intent.getAction();
switch (action) {
  case ROOTED_DEVICE:
  //
  // Respond to mobile app attacks and threats here, as seen above
  //

  // Notify Appdome to enforce the Threat Event after Threat Event is handled
  Intent newIntent = new Intent("ConditionalEnforcementEvent");
  newIntent.PutExtras(intent.GetExtras());
  newIntent.SetPackage(ApplicationContext.PackageName);
  ApplicationContext.SendBroadcast(newIntent);
}
Objective-C
[[NSNotificationCenter defaultCenter] addObserverForName: @"JailbrokenDevice" object:nil queue:nil usingBlock:^(NSNotification *note) {
    NSDictionary *userInfo = [note userInfo];
    if (userInfo == nil) {
        return;
    }

    //
    // Respond to mobile app attacks and threats here
    //

    // Notify Appdome to enforce the Threat Event after Threat Event is handled
    [[NSNotificationCenter defaultCenter] postNotificationName:@"ConditionalEnforcementEvent" object:nil userInfo:userInfo];
}];
Swift
NotificationCenter.default.addObserver(forName: NSNotification.Name("JailbrokenDevice"), object: nil, queue: nil) { notification in
    guard let userInfo = notification.userInfo else {
        return
    }
//
// Respond to mobile app attacks and threats here
//

// Notify Appdome to enforce the Threat Event after Threat Event is handled
NotificationCenter.default.post(name: NSNotification.Name("ConditionalEnforcementEvent"), object: nil, userInfo:userInfo)
Xamarin/MAUI iOS -CSharp
NSNotificationCenter.DefaultCenter.AddObserver(
  (NSString)"BlockedClipboardEvent",
  delegate (NSNotification obj) {
   Console.WriteLine("iOS Copy Paste Threat Event obj : {0}", obj);
    //
    // Respond to mobile app attacks and threats here, as seen above
    //

    // Notify Appdome to enforce the Threat Event after Threat Event is handled
    NSNotificationCenter.DefaultCenter.PostNotificationName((NSString)"ConditionalEnforcementEvent", null, obj.UserInfo);
  });
How to Enable Conditional Enforcement
The figure below shows where you can find the Conditional Enforcement feature for each of the runtime mobile app security, anti-fraud, anti-malware, mobile antibot, and other protections available on Appdome.
NOTE: We have used Root Detection as an example; you can enable Conditional Enforcement for any feature that includes Threat Events.
- Upload the Mobile App to Appdome’s Mobile App Security Build System
- Upload Method: Appdome Console or DEV-API
- Mobile App Formats: .ipa for an iOS device or .apk or .aab for Android
- Root Detection is compatible with Obj-C, Java, JS, C#, C++, Swift, Kotlin, Maui, Xamarin, and more.
- Build the feature: Root Detection
- Build Root Detection using Appdome’s DEV-API:
- Create and name the Fusion Set (security template) that will contain the Root Detection feature as shown below:
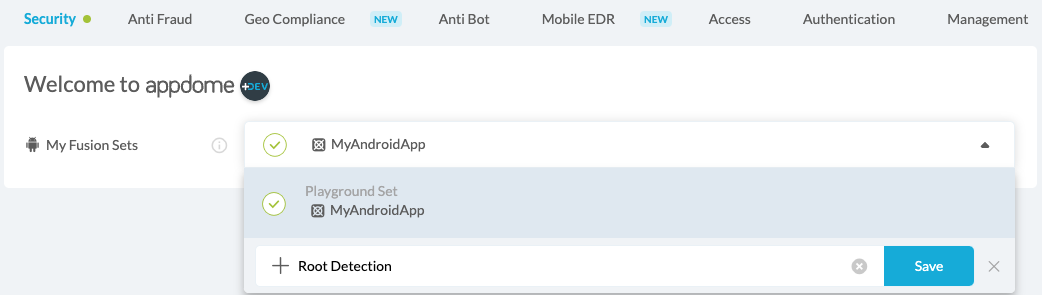
Figure 1: Fusion Set that will contain the Root Detection feature
Note: Naming the Fusion Set to correspond to the protection(s) selected is for illustration purposes only (not required). -
To add the Root Detection feature to this Fusion Set, follow the steps in the ‘Building the Root Detection feature via Appdome Console’ section.
- Open the Fusion Set Detail Summary by clicking the “…” symbol on the far-right corner of the Fusion Set, as shown in Figure 1 above, and get the Fusion Set ID from the Fusion Set Detail Summary (as shown below)
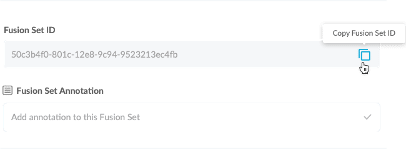
Figure 2: Fusion Set Detail Summary
Note: Annotating the Fusion Set to identify the protection(s) selected is optional (not mandatory).
- Follow the instructions below to use the Fusion Set ID inside any standard mobile DevOps or CI/CD toolkit such as Bitrise, App Center, Jenkins, Travis, Team City, Circle CI, or other systems
- Build an API for the app – for instructions, see the tasks under Appdome API Reference Guide
- Look for sample APIs in Appdome’s GitHub Repository
Building the Root Detection feature via Appdome Console
To add the Conditional Enforcement using Appdome Console, follow the instructions below:
- Where: Inside the Appdome Console, go to Build > Security Tab > OS Integrity section
- How: Toggle (turn ON) Root Detection > Threat Events > Conditional Enforcement, as shown below.
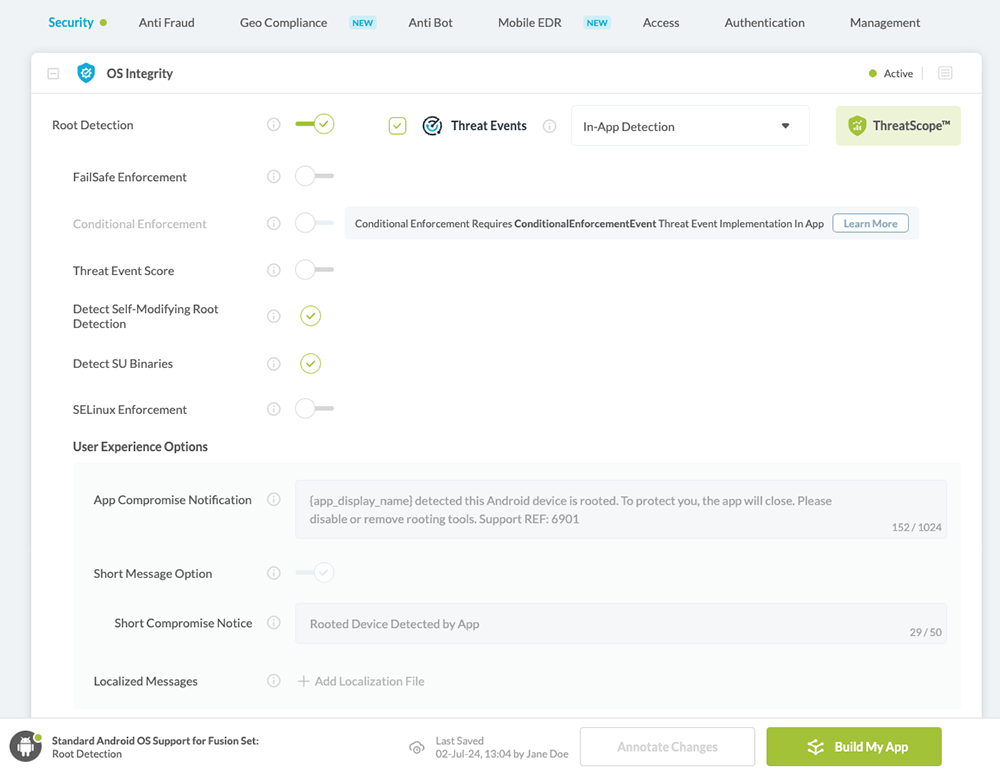
Figure 3: Validate Root Detection - When you select Root Detection, you’ll notice that the Fusion Set you created now bears the icon of the protection category that contains Root Detection.

Figure 4: Fusion Set that displays the newly added Root Detection protection - Click Build My App at the bottom of the Build Workflow (shown in Figure 3).
- Certify the Root Detection feature in Mobile Apps.
After building Root Detection, Appdome generates a Certified Secure™ certificate to guarantee that the Root Detection protection has been added and is protecting the app.
To verify that Conditional Enforcement protection has been added to the mobile app, locate the protection in the Certified Secure™ certificate as shown below:
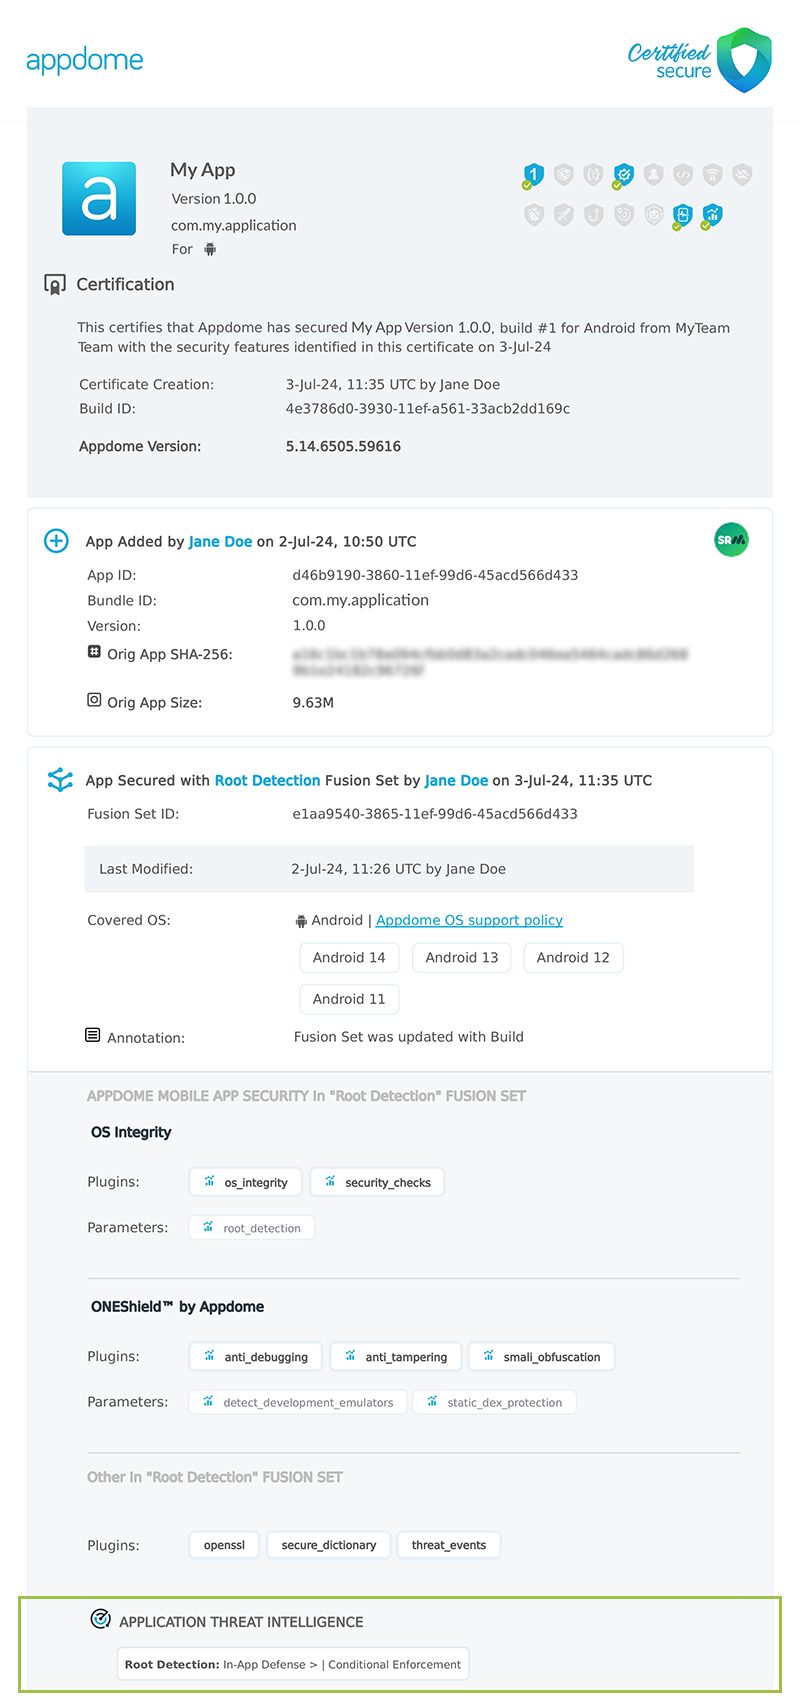
Figure 5: Certified Secure™ certificate
Each Certified Secure™ certificate provides DevOps and DevSecOps organizations with the entire workflow summary, audit trail of each build, and proof of protection have been added to each Mobile app. Certified Secure provides instant and in-line DevSecOps compliance certification that MobileBOT Source™ and other mobile app security features are in each mobile app build.
Related Articles:
- Threat-Events in Android & iOS Apps Explained
- Threat-Events™, In-App Threat Intelligence in Native iOS Apps
- Threat-Events™, In-App Threat Intelligence in Kotlin Apps
How Do I Learn More?
If you have any questions, please send them our way at support.appdome.com or via the chat window on the Appdome platform.
Thank you!
Thanks for visiting Appdome! Our mission is to secure every app on the planet by making mobile app security easy. We hope we’re living up to the mission with your project.