How to use Conditional Evaluation in Android & iOS Apps
This article provides an overview of the Conditional Evaluation feature, detailing its function, benefits, and how to integrate it into your app.
What is Conditional Evaluation?
Conditional Evaluation is a feature that allows Appdome’s security mechanisms—both tests and validations—to be initiated only after receiving explicit approval from the application. This approach ensures that security measures are in sync with the app’s user consent process, thereby enhancing user trust and meeting privacy standards.
Why Use Conditional Evaluation?
-
- User Privacy: This policy respects user privacy by not initiating any security tests or validations until after user consent has been obtained.
- Regulatory Compliance: Helps ensure compliance with global privacy laws that require user consent before data processing or security checks.
- Enhanced Trust: Builds user trust by transparently aligning security measures with user consent, demonstrating a commitment to privacy.
Prerequisites for using Appdome Conditional Evaluation
-
-
- Appdome account – Appdome DEV or Higher.
- Threat-Events license
- A license for Conditional Evaluation
- Mobile App (.ipa for iOS, or .apk or .aab for Android)
- Signing Credentials (e.g., signing certificates and provisioning profile) – see Signing Secure Android apps and Signing Secure iOS apps.
- Threat events and/or threat scores have been turned on for specific protection. You are using the correct identifiers for the Threat-Events for each protection.
- The “onConsentFinished” implementation has been added to your app prior to upload.
-
Using Input Threat-Events™ for Conditional Evaluation in Mobile Apps
Before enabling the Conditional Evaluation feature, ensure your app has been uploaded to the Appdome platform with the necessary input threat event, as shown in the following code example. This is crucial for the feature to function correctly.
Note: Input Threat Events are unavailable for multi-platform frameworks such as React Native, Flutter, and Cordova. If you are using these coding languages, it is recommended that you build a bridge class that acts as an intermediary between the framework and the mobile native API.
For more details on how to build bridging classes for Flutter and Cordova, please refer to the following documentation: Flutter and Cordova Plugin Development Guide.
Java
// Define placeholders for key and value
String key = "<KEY_PLACEHOLDER>";
 String value = "<VALUE_PLACEHOLDER>";
 // Create a new intent with the action "ConditionalEvaluationEvent"
Intent intent = new Intent("ConditionalEvaluationEvent");
// Create a bundle to hold the data
Bundle bundle = new Bundle();
// Add the key-value pair to the bundle
bundle.putString(key, value);
// Attach the bundle to the intent
intent.putExtras(bundle);
// Get the application's context
Context context = getApplicationContext();
// Set the package name for the intent
intent.setPackage(context.getPackageName());
// Send the broadcast with the intent
context.sendBroadcast(intent);
Kotlin
val key = "KEY_PLACEHOLDER>"
val value = "<VALUE_PLACEHOLDER>"
val intent = Intent("ConditionalEvaluationEvent")
val bundle = Bundle()
bundle.putString(key, value)
intent.putExtras(bundle)
val context = applicationContext
intent.`package` = context.packageName

// Sending information back to Appdome
context.sendBroadcast(intent)
Xamarin/MAUI Android – C#
string key = "<KEY_PLACEHOLDER>";
string value = "<VALUE_PLACEHOLDER>";
// Create a new intent with the action "ConditionalEvaluationEvent"
Intent intent = new Intent("ConditionalEvaluationEvent");
// Create a bundle to hold the data
Bundle bundle = new Bundle();

// Add the key-value pair to the bundle
bundle.PutString(key, value);
// Attach the bundle to the intent
intent.PutExtras(bundle);
// Set the package name for the intent
intent.SetPackage(ApplicationContext.PackageName);
// Send the broadcast with the intent
ApplicationContext.SendBroadcast(intent);
Objective-C
NSString *key = @;
KEY_PLACEHOLDER > ";
NSString *value = @"";
NSDictionary *userInfo = @{key : value};
// Sending information back to Appdome
[[NSNotificationCenter defaultCenter]
postNotificationName:@"ConditionalEvaluationEvent"
object:nil
userInfo:userInfo];
Swift
let key = "<KEY_PLACEHOLDER>"
let value = "<VALUE_PLACEHOLDER>"
let userInfo = [key: value]

 // Sending information back to Appdome
 NotificationCenter.default.post(
   name
   : Notification.Name("ConditionalEvaluationEvent"), object
   : nil, userInfo
   : userInfo)
Xamarin/MAUI iOS -C#
String key = "<KEY_PLACEHOLDER>";
String value = "<VALUE_PLACEHOLDER>";
// Create a dictionary to hold the data
NSDictionary userInfo = new NSDictionary(key, value);
// Post a notification with the data
NSNotificationCenter.DefaultCenter.PostNotificationName("ConditionalEvaluationEvent", null, userInfo);
How to Enable Conditional Evaluation
The figure below shows where you can find the Conditional Evaluation feature for each of the runtime mobile app security, anti-fraud, anti-malware, mobile antibot, and other protections available on Appdome.
Note: We have used Android MiTM Prevention as an example; you can enable Conditional Evaluation for any feature that includes Threat Events.
On Appdome, follow these 3 simple steps to create self-defending Android Apps that Prevent Android MiTM Attacks without an SDK or gateway:
-
Designate the mobile app to be protected.
1.1. Upload a mobile app via the Appdome Mobile Defense platform GUI or via Appdome’s DEV-API or CI/CD Plugins.
1.2. Android Formats: .apk or .aab / iOS Formats: .ipa
1.3. Android MiTM Prevention is compatible with Java, JS, C++, C#, Kotlin, Flutter, React Native, Unity, Xamarin, Cordova, and other Android apps. -
Select the defense: Android MiTM Prevention
2.1. Create and name the Fusion Set (security template) that will contain the Android MiTM Prevention feature as shown below:

Figure 1: Fusion Set that will contain the Android MiTM Prevention feature
2.1.1. Follow the steps in sections 2.2-2.2.2 of this article to add the Android MiTM Prevention to your Fusion Set via the Appdome Console.2.1.2. When you select the Android MiTM Prevention, you’ll notice that the Fusion Set you created in step 2.1 now bears the icon of the protection category that contains Android MiTM Prevention.
Figure 2: Fusion Set that displays the newly added Android MiTM Prevention protection.
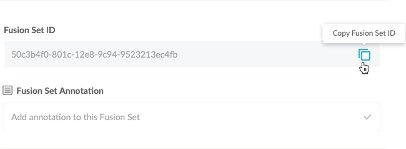
Note: Annotating the Fusion Set to identify the protection(s) selected is optional only (not mandatory).2.1.3. Open the Fusion Set Detail Summary by clicking the “…” symbol on the far-right corner of the Fusion Set. Copy the Fusion Set ID from the Fusion Set Detail Summary (as shown below): Figure 3: Fusion Set Detail Summary2.1.4. Follow the instructions below to use the Fusion Set ID inside any standard mobile DevOps or CI/CD toolkit like Bitrise, Jenkins, Travis, Team City, Circle CI, or other systems:2.1.4.1. Refer to the Appdome API Reference Guide for API building instructions.
2.1.4.2. Check Appdome’s GitHub Repository for sample APIs.
Add the Android MiTM Prevention to the security template
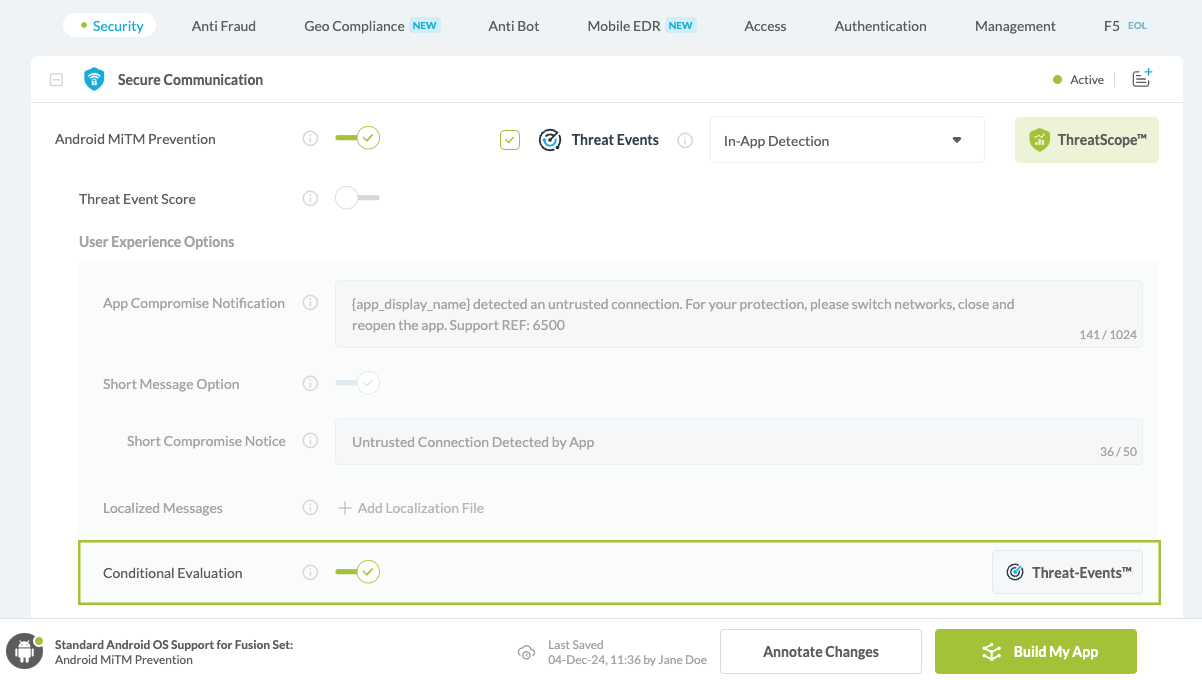
2.2.1. Navigate to Build > Security tab > Secure Communication section in the Appdome Console.2.2.2. Toggle On Android MiTM Prevention > Conditional Evaluation(a) Choose to monitor this attack vector by checking the Threat Events checkbox associated with Android MiTM Prevention as shown below.
(b) To receive mobile Threat Monitoring, check the ThreatScope™ box as shown below.
For more details, see our knowledge base article on ThreatScope™ Mobile XDR.
Figure 4: Selecting Android MiTM Prevention with Conditional Evaluation
Note: The Appdome platform displays the Mobile Operating System supported by each defense in real-time. For more details, see our OS Support Policy KB.2.2.3. Select the Threat-Event™ in-app mobile Threat Defense and Intelligence policy for Android MiTM Prevention:
2.2.3.1. Threat-Events™ OFF > In-App Defense
If the Threat-Events™ setting is not selected. Appdome will detect and defend the user and app by enforcing Conditional Evaluation.
2.2.3.2. Threat-Events™ ON > In-App Detection
When this setting is used, Appdome detects Android MiTM Prevention and passes Appdome’s Threat-Event™ attack intelligence to the app’s business logic for processing, enforcement, and user notification. For more information on consuming and using Appdome Threat-Events™ in the app, see the section Using Threat-Events™ for Android MiTM Prevention Intelligence and Control in Mobile Apps.
2.2.3.3. Threat-Events™ ON > In-App Defense
When this setting is used, Appdome detects and defends against MiTM Attacks (the same as Appdome Enforce) and passes Appdome’s Threat-Event™ attack intelligence to the app’s business logic for processing. For more information on consuming and using Appdome Threat-Events™ in the app, see the section Using Threat-Events™ for Android MiTM Prevention Intelligence and Control in Mobile Apps.
2.2.4. Configure the User Experience options for Android MiTM Prevention
With Threat-Events™ OFF, Appdome provides several user experience options for mobile brands and developers.2.2.4.1. App Compromise Notification: Customize the pop-up or toast Appdome uses to notify the user when a threat is present while using the protected mobile app.2.2.4.2. Short message Option. This is available for mobile devices that allow banner notifications for security events.2.2.4.3. Localized Message Option. Allows Appdome users to support global languages in security notifications.
Figure 5: Default User Experience Options for Appdome’s Android MiTM Prevention
2.2.4.4. Android MiTM Prevention Threat Code™. Appdome uses AI/ML to generate a unique code each time iOS MiTM Prevention is triggered by an active threat on the mobile device. Use the code in Appdome Threat Resolution Center™ to help end users identify, find and resolve active threats on the personal mobile devices.
Congratulations! The Secure Communication – Android MiTM Prevention protection is now added to the mobile app
-
Certify the Android MiTM Prevention feature in Android Apps
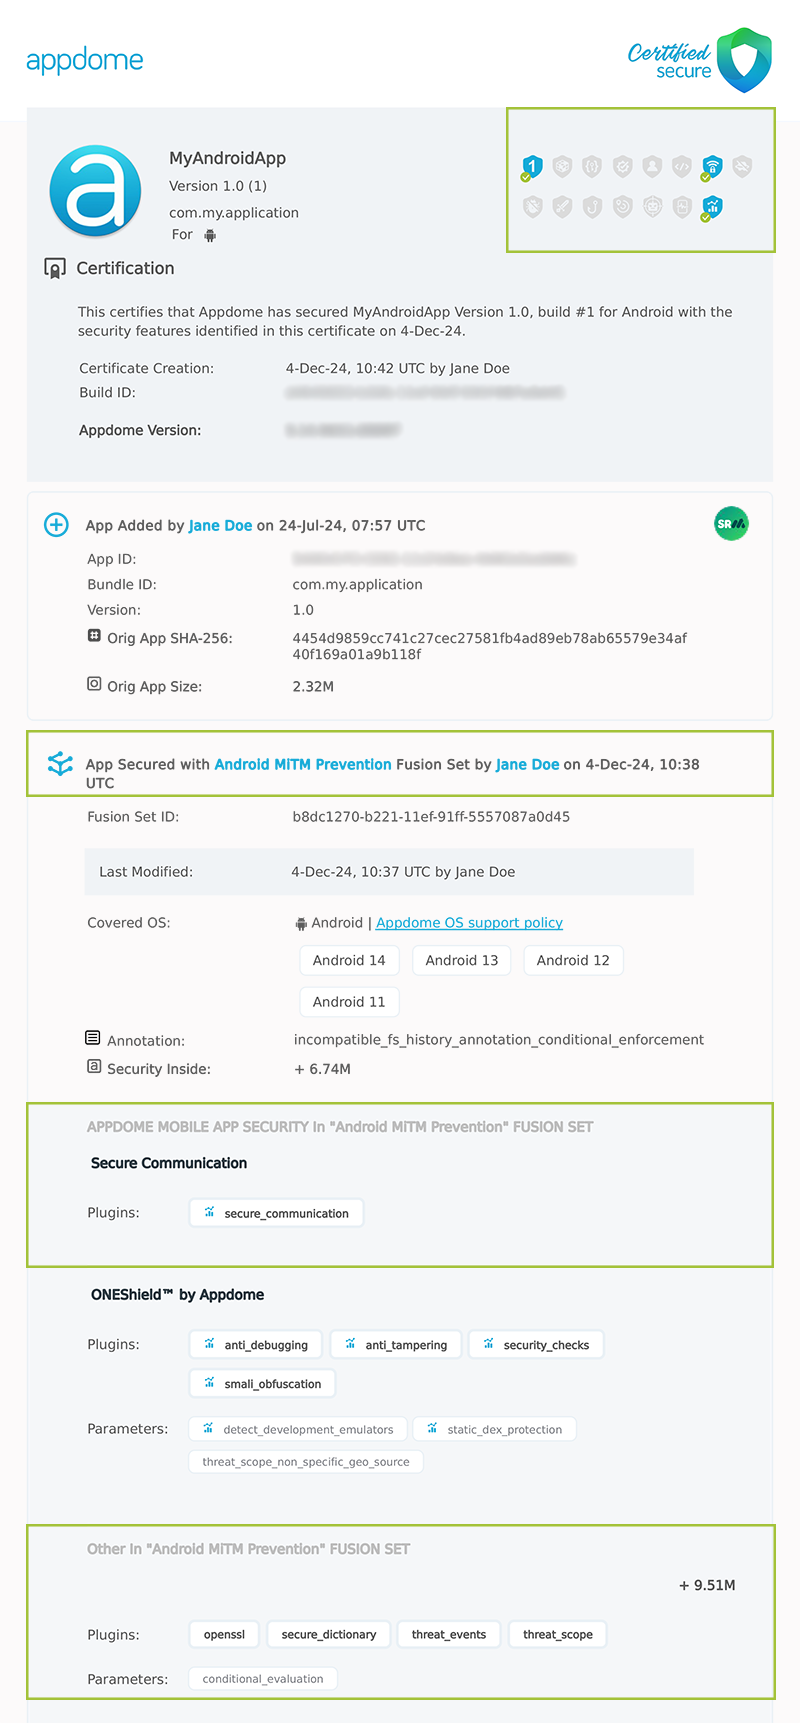
After building Android MiTM Prevention, Appdome generates a Certified Secure™ certificate to guarantee that the Android MiTM Prevention protection has been added and is protecting the app. To verify that the Android MiTM Prevention protection has been added to the mobile app, locate the protection in the Certified Secure™ certificate as shown below:

Figure 6: Certified Secure™ certificate
Each Certified Secure™ certificate provides DevOps and DevSecOps organizations the entire workflow summary, audit trail of each build, and proof of protection that Prevent Logging Attacks has been added to each Android app. Certified Secure provides instant and in-line DevSecOps compliance certification that Prevent Logging Attacks and other mobile app security features are in each build of the mobile app
Related Articles
- Threat-Events in Android & iOS Apps Explained
- How to use Conditional Enforcement in Mobile Apps
- Threat-Events™, In-App Threat Intelligence in Native iOS Apps
- Threat-Events™, In-App Threat Intelligence in Kotlin Apps
- Threat-Events™, In-App Threat Intelligence in React Native Apps
- Threat-Events™, In-App Threat Intelligence in Swift Apps
- Threat-Events™, In-App Threat Intelligence in Native Android Apps
How Do I Learn More?
If you have any questions, please send them our way at support.appdome.com or via the chat window on the Appdome platform.
Thank you!
Thanks for visiting Appdome! Our mission is to secure every app on the planet by making mobile app security easy. We hope we’re living up to the mission with your project.
