How to Enforce mTLS Pre-Authentication in MobileBOT™ Defense
This Knowledge Base article describes how to use Appdome’s AI/ML in your CI/CD pipeline to continuously deliver plugins that Enforce mTLS Pre-Authentication in Android apps.
What is Traditional mTLS Pre-Authentication?
Mutual TLS (mTLS) Pre-Authentication is a process where both the client and the server authenticate each other before a secure communication session is established. Unlike standard TLS, which only verifies the server, mTLS requires the client to present a valid certificate to verify its identity. This ensures that both parties are trusted, providing an additional layer of security by preventing unauthorized devices or entities from accessing the service.
mTLS pre-authentication is often used to secure communications in sensitive mobile applications such as financial transactions, healthcare systems, and enterprise environments. It works by:
- Initiating the TLS handshake.
- Requesting and validating certificates from both the client and the server.
- Establishing an encrypted connection only if both certificates are validated.
This approach mitigates various risks, including impersonation attacks, man-in-the-middle (MITM) attacks, and unauthorized access.
How Does Appdome Protect Mobile Apps from mTLS Pre-Authentication Attacks?
MobileBOT™ Defense enhances traditional mTLS Pre-Authentication by embedding this robust two-way authentication directly into mobile app interactions. One of the key advantages is that the app becomes an integral part of the mTLS process, ensuring that both the mobile app and backend server authenticate each other before any communication occurs. This guarantees a more secure mobile environment where bot attacks, automated threats, and impersonation risks are prevalent.
How MobileBOT™ Defense Differs from Traditional mTLS
- Secure Certificate Storage: Unlike standard implementations of mTLS, where handling the certificate securely on mobile devices can be a challenge, MobileBOT™ Defense securely stores the client’s p12 certificate within the app, protecting it from tampering or unauthorized access. This ensures that the certificate required for mTLS is always securely available, further enhancing security.
- Simplified Configuration Process: MobileBOT™ Defense simplifies the complex mTLS configuration typically required in traditional environments. By automating critical parts of the process, mobile developers and security teams can more easily integrate mTLS into their apps without needing extensive configuration steps or managing complex certificate setups.
- Client Provides CA Certificate: For the mTLS Pre-Authentication process to be configured on Appdome, the client must provide Appdome with the CA (Certificate Authority) certificate. This certificate is crucial to authenticate the mobile app during the mutual TLS process, ensuring that only authorized devices can access the service.
Appdome’s MobileBOT™ Defense enhances mTLS Pre-Authentication by integrating it directly into mobile apps. This feature automatically establishes secure communication channels by verifying both the client and the server’s identities without requiring additional coding or SDKs from the app developer. The process safeguards the mobile app against impersonation and ensures that only authorized servers and apps can communicate with one another.
Prerequisites for Using Appdome's mTLS Pre-Authentication Plugins:
To use Appdome’s mobile app security build system to Enforce mTLS Pre-Authentication , you’ll need:
- Appdome account (create a free Appdome account here)
- A license for mTLS Pre-Authentication
- Mobile App (.apk or .aab for Android)
- Signing Credentials (see Signing Secure Android apps and Signing Secure iOS apps)
How to Implement Enforce mTLS Pre-Authentication in Android Apps Using Appdome
On Appdome, follow these 3 simple steps to create self-defending Android Apps that Enforce mTLS Pre-Authentication without an SDK or gateway:
-
Designate the Mobile App to be protected.
-
Upload an app via the Appdome Mobile Defense platform GUI or via Appdome’s DEV-API or CI/CD Plugins.
-
Android Formats: .apk or .aab
-
mTLS Pre-Authentication is compatible with: Java, JS, C++, C#, Kotlin, Flutter, React Native, Unity, Xamarin, Cordova and other Android apps.
-
-
Select the defense: mTLS Pre-Authentication.
-
-
Follow the steps in Sections 2.2-2.2.2 of this article to add the mTLS Pre-Authentication feature to your Fusion Set via the Appdome Console.
-
When you select the mTLS Pre-Authentication you'll notice that the Fusion Set you created in step 2.1 now bears the icon of the protection category that contains mTLS Pre-Authentication.

Figure 2: Fusion Set that displays the newly added mTLS Pre-Authentication protection
Note: Annotating the Fusion Set to identify the protection(s) selected is optional only (not mandatory). -
Open the Fusion Set Detail Summary by clicking the “...” symbol on the far-right corner of the Fusion Set. Copy the Fusion Set ID from the Fusion Set Detail Summary (as shown below):
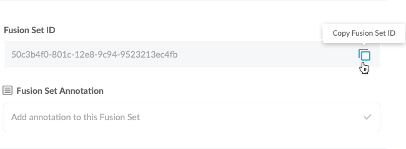
Figure 3: Fusion Set Detail Summary
-
Follow the instructions below to use the Fusion Set ID inside any standard mobile DevOps or CI/CD toolkit like Bitrise, Jenkins, Travis, Team City, Circle CI or other system:
-
Refer to the Appdome API Reference Guide for API building instructions.
-
Look for sample APIs in Appdome’s GitHub Repository.
-
Create and name the Fusion Set (security template) that will contain the mTLS Pre-Authentication feature as shown below:
Figure 1: Fusion Set that will contain the mTLS Pre-Authentication feature
-
-
Add the mTLS Pre-Authentication feature to your security template.
-
Navigate to Build > Anti Bot tab > MobileBOT™ Defense section in the Appdome Console.
-
Toggle On mTLS Pre-Authentication.
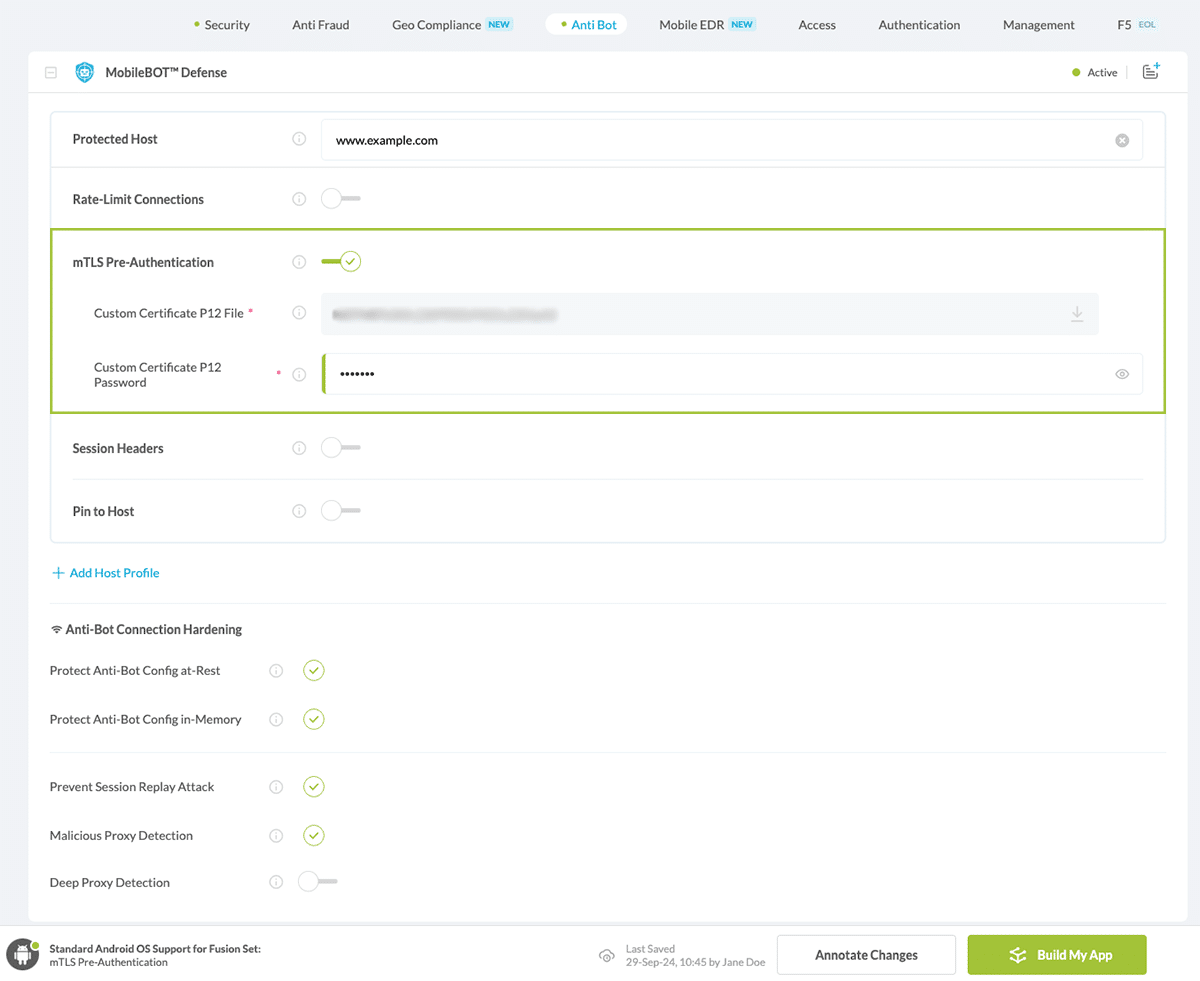
Figure 4: Selecting Enforce mTLS Pre-Authentication
-
Congratulations! The mTLS Pre-Authentication protection is now added to the mobile app -
-
Certify the mTLS Pre-Authentication feature in Android Apps
After building mTLS Pre-Authentication, Appdome generates a Certified Secure™ certificate to guarantee that the mTLS Pre-Authentication protection has been added and is protecting the app. To verify that the mTLS Pre-Authentication protection has been added to the mobile app, locate the protection in the Certified Secure™ certificate as shown below:
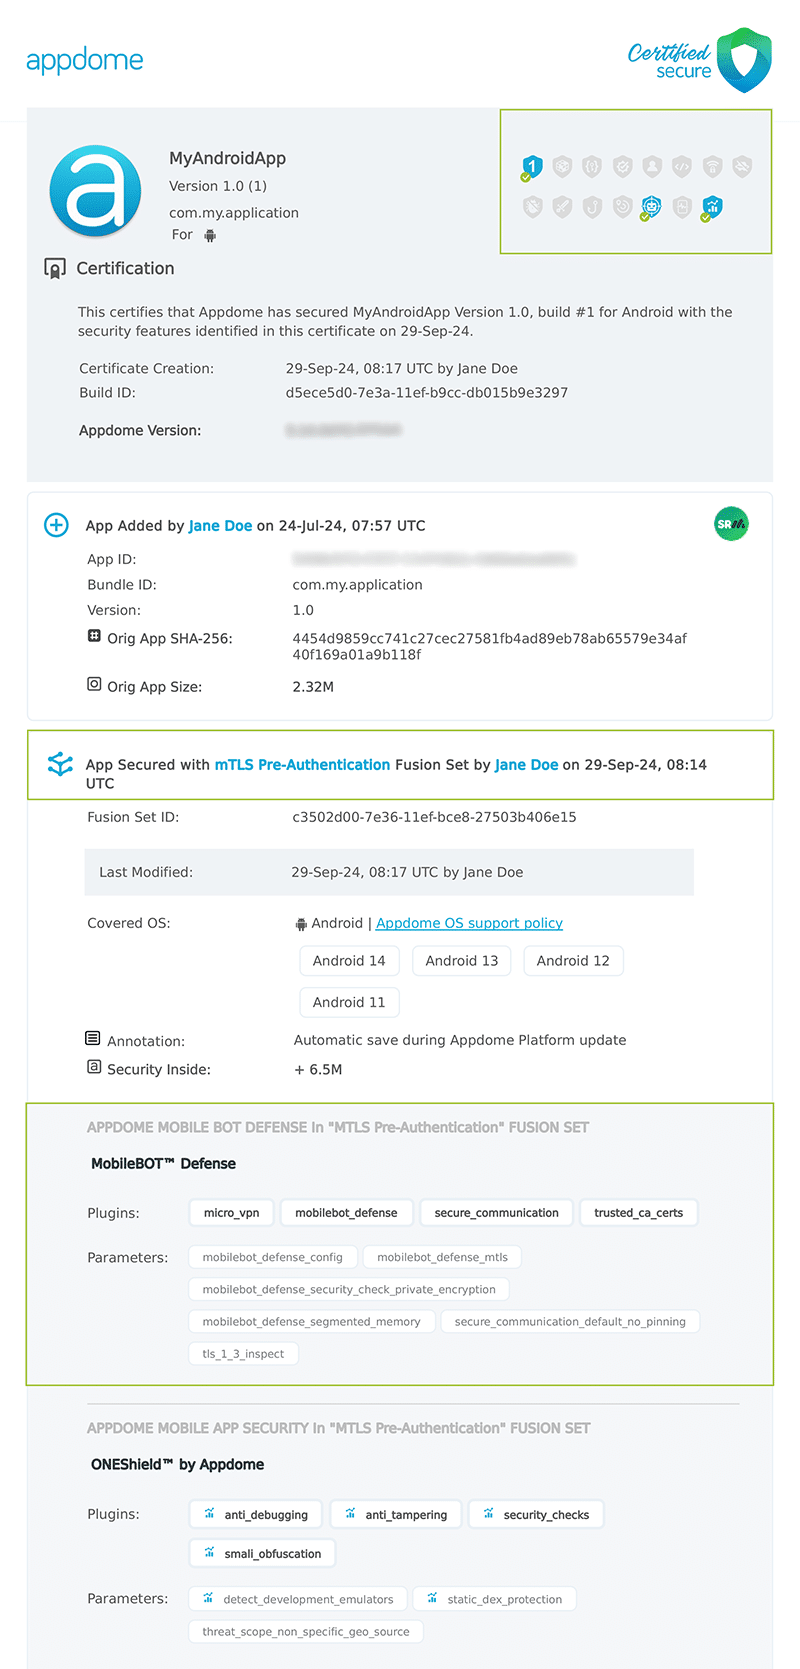
Figure 5: Certified Secure™ certificate
Each Certified Secure™ certificate provides DevOps and DevSecOps organizations the entire workflow summary, audit trail of each build, and proof of protection that mTLS Pre-Authentication has been added to each Android app. Certified Secure provides instant and in-line DevSecOps compliance certification that mTLS Pre-Authentication and other mobile app security features are in each build of the mobile app.
Using Appdome, there are no development or coding prerequisites to build secured Android Apps by using mTLS Pre-Authentication. There is no SDK and no library to code or implement in the app and no gateway to deploy in your network. All protections are built into each app and the resulting app is self-defending and self-protecting.
Releasing and Publishing Mobile Apps with mTLS Pre-Authentication
After successfully securing your app by using Appdome, there are several available options to complete your project, depending on your app lifecycle or workflow. These include:
- Customizing, Configuring & Branding Secure Mobile Apps.
- Deploying/Publishing Secure mobile apps to Public or Private app stores.
- Releasing Secured Android & iOS Apps built on Appdome.
Related Articles:
- How to Use Session Headers in Mobile Bot Defense
- How to Secure Android & iOS Apps with Pin to Host
- How to use MobileBOT Source™ with Mobile Bot Defense
- How to use DEVICETrust™ with MobileBOT™ Defense
How Do I Learn More?
If you have any questions, please send them our way at support.appdome.com or via the chat window on the Appdome platform.
Thank you!
Thanks for visiting Appdome! Our mission is to secure every app on the planet by making mobile app security easy. We hope we’re living up to the mission with your project.